Creating a painterly portrait
What separates a portrait (even a ‘creative portrait’) from a typical fashion image is the notion of a human element. Fashion images are pictures of clothing that happen to contain people, while portraits are pictures of people whose clothes or adornments are usually immaterial. In a fashion image, the subject is a model; a portrait is usually of a real person, whether or not they are playing themselves as their role.
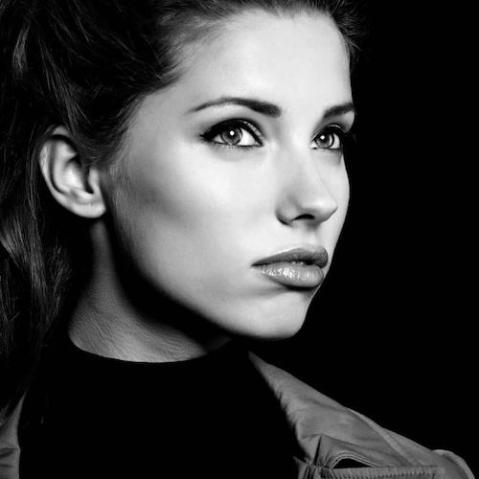
 Grace (2011)
Curves adjustments in Photoshop, subtle airbrushing, and a Diffuse Glow all added to the pristine, painterly aesthetic of these portraits of Grace.
These images of model Grace Gray can certainly be categorised as fashion—but also as portraiture. The focus on her physiognomy, her connection with the camera, and the distinct representation of her personality all play a part in an image story that is not just about the dress she is wearing. These shots were taken at a prop house in London, on an original Victorian street that ran right though the middle of the location.
Grace’s costume was wonderful for its texture and glow in the final images, and her face, hair, and makeup had a pin-up quality that was perfectly complemented by post-processing. Grace was shot with natural lighting, but also a huge reflector (a Photoflex ‘LitePanel’) camera right, which made a big difference in bouncing back the overhead sun to fill in the shadows.
 Before and after
During the shoot, what made these images work was Grace’s character and the way she expressed herself performatively for the camera. In processing, what polished the images was the use of the Curves adjustments in Photoshop to lift the dark shadows of the images, deepen the blues and greens, and make the reds and yellows ‘pop’ by contrast.
This was enhanced by manually increasing the saturation of the reds, and taking the Clone Stamp and Patch tool to clean up areas of blemish on the skin, sharpening the eyes, and making the lips redder by selecting around them and increasing their saturation. The whites of the dress also benefited from a subtle Diffuse Glow, ensuring that none of the highlights on the ‘poodle puffs,’ the dress, or the skin were blown out.
 Full of Grace (2011)
Shot with a Phase One 645DF medium- format camera and natural lighting.
Even though the adjustments in Photoshop were relatively subtle and did not change anything compositionally about the photograph, the changes made the images a lot more interesting in my opinion. They lifted the image from ‘a shot in-camera’ to a polished image: painterly, yet still full of detail.
Creative Portrait Photography by Natalie Dybisz offers an extensive behind-the-scenes look at the creative process of one of today’s most exciting and popular professional portrait photographers and gives you everything you need to step up your portrait photography to take photos that express the style and personalities of both you and your subjects. With over 150 portraits and a showcase chapter featuring work from five top portrait photographers explaining how each shot was achieved, you’ll be inspired to take your portrait photography to a whole new level of creativity.
 Creative Portrait Photography
Natalie Dybisz
Buy it now!
RRP for print edition: £17.99