The trial and error of night photography
Here in the northern hemisphere, we’re approaching the shortest day, which means that whether we want to or not, we might find ourselves taking photos at night. Seeing as photography means ‘drawing with light’, it might seem counter-intuitive, but some super images can be created with limited light sources.

There’s no clear cutoff between low-light photography and night photography, and both use the same basic principle: an ultra-long shutter speed supported by a tripod and a remote release. However, night photography brings with it a number of unique challenges and creative opportunities. The primary challenges include focusing and composing in near or total darkness, and calculating the correct exposure.
Focusing
In daylight, focusing your camera is a simple matter, whether you’re relying on the camera’s autofocus system, or focusing manually. When you are shooting at night, though, things get much more complicated. For a start, there is often insufficient light for your camera’s autofocus system to work, so you’ll have to focus the lens manually. Yet even this isn’t straightforward as the low light levels often mean you simply can’t see any detail in the scene through your viewfinder, so how exactly are you supposed to focus when you can’t see what you want to photograph?

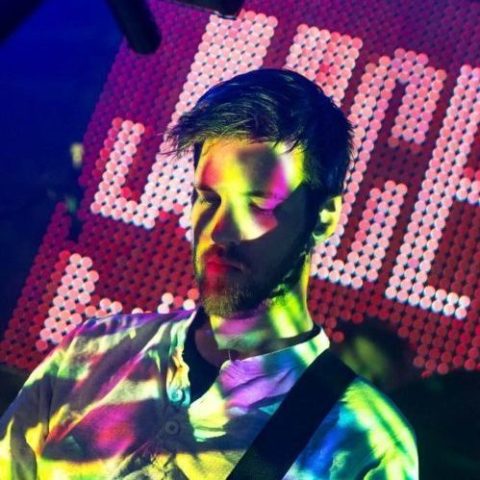
Taking your camera out when most people are sleeping is the perfect opportunity to record scenes that are both familiar, yet somehow remote from our everyday lives.
The answer is to estimate the distance from your camera to the main subject in the scene and set the focus manually. If you’re shooting a landscape this is fairly easy; the natural focus point is the horizon, all you need to do is set the lens to infinity focus. If the main subject is closer to the camera, setting an accurate focus point is much more difficult, especially if you can’t see the subject to guess the distance to start with. In these cases, a powerful torch can be a great help as it will let you add temporary light to the scene to help gauge the distance.
Composition
Focusing is not the only issue you will have when it comes to photographing night scenes. When you can’t see the scene you’re photographing, composing a shot can be very difficult, if not impossible. However, as your camera will be on a tripod, the easiest way to get around this is to shoot some test frames at the highest ISO setting using the widest aperture your lens offers. This will give the shortest possible exposure time, enabling you to review your composition on the camera’s LCD screen and adjust the composition as necessary. Once you have composed the image, you can set the aperture and ISO you want to use for the final shot and make your extended exposure.
Exposure
In low-light conditions, a camera’s metering system is less reliable than it will be in daylight, and at night it can prove even more difficult. The camera’s meter will assume that the scene comprises mostly mid-tones, which clearly isn’t the case at night. As a consequence, if you rely on your in-camera meter to expose a night scene, it will likely emerge wildly over-exposed.

Night-time transforms this Madrid shopping centre into a more compelling scene.
Do use the suggested meter reading as a starting point, but you’ll find that applying negative exposure compensation—beginning at -1 or -2—will bring you closer to a good exposure.
But what happens if you need a shutter speed longer than 30 seconds, which is the maximum selectable shutter speed for many cameras? You have two options, but the simplest is to implement trial and error in Bulb mode. Use a stop watch or a remote release with a timer to extend the exposure time beyond 30 seconds. If you double the exposure time of each shot, you will effectively increase the exposure by one stop. Use your camera’s histogram to hit on an exposure time.
The alternative to this trial-and-error approach is to calculate the correct exposure time, although this requires a much better understanding of ‘stops’ in terms of ISO, aperture, and shutter speed.
Not an exact science
At very long exposures like this, photography isn’t an exact science, so experiment with extended and reduced exposure times. You should bear in mind that significant adjustments will be needed to have a noticeable effect. It’s possible that you might find yourself adjusting your exposure by 15 or 16 minutes to increase or decrease it by half a stop!

Motorway overpass, Shanghai.
Take creative control of your images and master the essentials of proper exposure with David Nightingale’s comprehensive guide to photography’s most fundamental skill: Mastering Exposure. Reinvigorate your artistic enthusiasm by being able to recognise not just the ‘correct’ exposure, but also numerous other creative options for how to capture any given scene. Your photography will stand apart from the crowd, and reflect your own unique vision of the world, all because you have mastered the best techniques for capturing stunning images.
[one_whole boxed=”true”]
 Mastering Exposure, by David Nightingale
£7.99 Download the PDF now!
£14.99 for the print and digital version!
[button color=”Accent-Color” size=”small” url=”https://www.ilexinstant.com/product/mastering-exposure/” text=”Buy now!”]
[/one_whole]