Creating enveloping light. And when to use it.
If you take soft light to its extreme, you can devise a set up to completely surround a subject, bathing it in total, diffuse light that fills in every nook and cranny, eliminates every shadow, and makes the subject appear lightweight and buoyant.

This enveloping light is a particular style, and not necessarily suitable for all subjects. For instance, you may think that if soft light is ideal for portraits, then completely suffusing your subject in an abundance of soft light is all the better; but that can too easily result in overly surreal and unrealistic portraits. Keep in mind that enveloping light is rarely found in nature, and your eye will recognise it as exceptional.
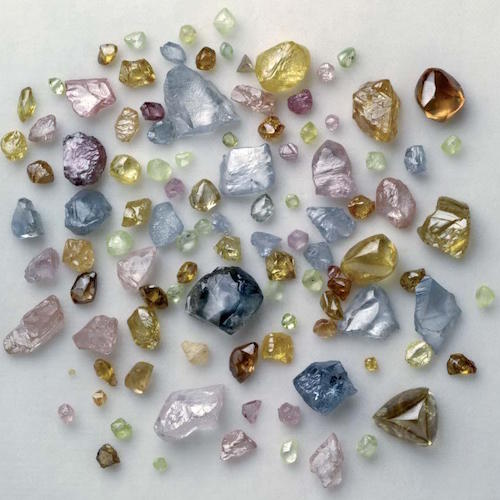
That said, there are many cases when enveloping light benefits a subject, and it is a useful tool when dealing with particular lighting problems. For instance, if you are photographing a highly reflective object, it may be impossible to set up the shot without having studio equipment appearing in the frame, reflected off the object’s surface. For this reason, enveloping light is often used for still lifes and close-up shots.
The easiest way to cover a subject from all angles with soft, diffuse light is to use a light tent. These lighting accessories are a simple affair, and involve surrounding the subject with a diffusing material of some sort—white fabric is the most common, but any translucent material will do. Arranged correctly, the light tent will diffuse any light coming from outside the frame, meaning you can use point-source lights and move them freely around the set until the desired effect is achieved. The lights must be positioned far enough away that they do not create perceptible hot spots on the tent’s surfaces, but still close enough to give enough illumination for an adequate exposure. This is particularly important with macro and close-up photography, which often use narrow apertures for an abundance of depth of field, at the expense of available light.
Additionally, once the light is diffused inside the tent, it continues to reflect across all the interior surfaces, further evening the spread of light on the enclosed subject.
Light tents aren’t limited to studio work, however. They can also be set up in the eld, where they can diffuse otherwise harsh sunlight. This is particularly suitable for capturing small insects or flower specimens as you encounter them in the wild.

By surrounding them in artificial material, they will lose their sense of environment; but the effect can also evoke the classic look of natural history illustration, with its clean, idyllic portrayal cast against pure white. Light tents in the field may also simply be a necessity for capturing subjects that you could not otherwise move into the studio—for instance, many gardens don’t look kindly on you plucking out their prized orchids or stealing their wildlife.
Improvised light tents are simple enough, you need only a clean white sheet and a stand from which to hang it. Circle the sheet around the subject, and poke your camera through the slit where the two ends meet. However, for best results that avoid any textured surfaces, a dedicated light tent is the way to go. These come in a variety of sizes, and are collapsible, making them much easier to take in the field.
Learn to “read” light in this complete course on the building blocks of photography. Michael Freeman teaches not only how to see the subtle nuances of light and shade, but also how your camera views and records them, to make sure you approach each scene with the optimal settings and appropriate technical know-how.
 Photo School: Light and Lighting
Michael Freeman and Catherine Quinn