What do we mean by 'expose to the right?'
As a general rule, you’re taught to nail your exposure exposure in-camera and that you should aim to get as close as possible to the image you envisage as you take the shot. Occasionally, however, you need to break the rules a little to secure the best result.
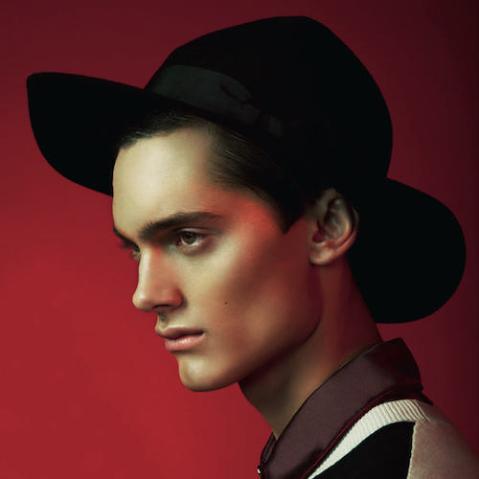
 90mm, 1/100 second, ƒ/5.6, ISO 320
This shot was created with every intention of being
low key, and while you might think that it was shot under-exposed, the opposite was true to help keep the shadows noise-free.
Bit depth
To explain why, we need to take a more detailed look at the way in which your camera records data. Most current DSLRs or equivalent cameras are capable of creating a 14-bit Raw file. This means that every pixel within your image can be stored at one of 16,384 levels of brightness (two to the power of 14). So why is this significant?

In other words, if you underexpose by just one stop you sacrifice 50% of the data you could have captured, two stops and you throw away 75%, three stops 87%, and so on.
Minimising noise
By far and away the biggest source of noise in an image is shot noise, something we can do absolutely nothing about—it’s a pervasive feature of light. Noise is much more of a problem in low light than it is in bright light because the noise-to-light ratio is much higher. In other words, there will always be more noise in the darker areas of an image than there will in the brighter areas.
One way to avoid this is to ‘expose to the right,’ i.e. shift the exposure as close to the right-hand edge of the histogram as possible without clipping the highlights. This will create an image that contains a full range of tones, but it will appear too bright. To counteract this, the image can be darkened during the Raw conversion process. But why go to all this trouble?
Imagine a scene with a dynamic range of six stops, and then imagine that scene inadvertently or intentionally underexposed by two stops. Your camera has a dynamic range of eight stops, so you would have recorded all the data, but in skewing it towards the left of the histogram, you threw away 75% of the data you could have captured.
We already know that every image contains noise, but the extent to which this is problematic depends, in part at least, on the noise-to-light ratio. Put another way, the level of noise remains constant, irrespective of brightness, but the brighter the light, the less visible it will be as the signal-to-noise ratio is better. For example, in the first stop where we have 8192 levels of brightness, the noise is effectively invisible. In the lower stops, where we have much less data, the noise will be considerably more noticeable, or may overpower the signal altogether.
To return to our example, because the dynamic range of the scene was six stops, and we underexposed by two, the deepest shadows fall into the eighth stop, where we only have 64 levels of brightness to describe the tonality of the scene. Chances are the noise will be very evident, especially if we try to brighten this area as the signal-to-noise ratio is low.
Alternatively, had we exposed to the right, this shadow detail would have fallen into the sixth stop, where we have 256 levels to describe the tonal range. In this case, our signal is four times stronger (64 × 4 = 256) so the signal-to-noise ratio is much better.
In summary, exposing to the right and then darkening an image during the Raw conversion process will always produce an image with less noise, but the extent to which this is either necessary or, indeed, worth the effort will depend on whether a) the detail in the very darkest areas of the image is intrinsically significant, and b) you intend to brighten these areas in post. If so, particularly if you intend to brighten these areas significantly, exposing to the right as you take the shot will give you more and cleaner data to work with.
Take creative control of your images and master the essentials of proper exposure with David Nightingale’s comprehensive guide to photography’s most fundamental skill: Mastering Exposure. Reinvigorate your artistic enthusiasm by being able to recognise not just the ‘correct’ exposure, but also numerous other creative options for how to capture any given scene. Your photography will stand apart from the crowd, and reflect your own unique vision of the world, all because you have mastered the best techniques for capturing stunning images.
 Mastering Exposure, by David Nightingale
£7.99 Download the PDF now!